
Table of Contents
Imagine biting into a slice of heaven that combines the rich, creamy texture of cheesecake with the bright, sweet burst of fresh strawberries. These homemade dessert bars are more than just a treat. They’re a culinary experience that turns ordinary moments into something extraordinary. Strawberry cheesecake bars offer the perfect balance of indulgence and simplicity, making them an irresistible option for home bakers looking to create an easy recipe that impresses.
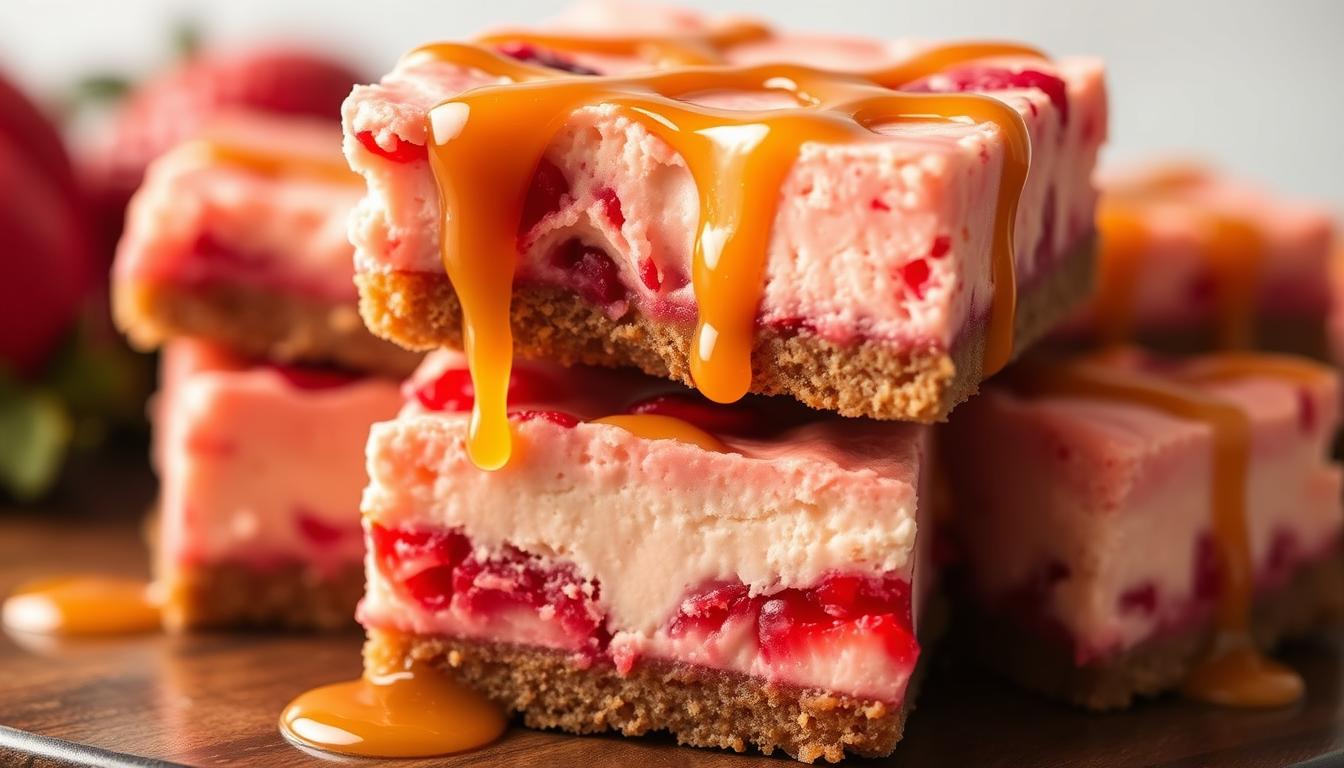
Dessert lovers have long sought a convenient way to enjoy the classic flavors of cheesecake without the complexity of a traditional full-sized cake. These strawberry cheesecake bars solve that problem perfectly. With a buttery graham cracker crust, smooth cream cheese filling, and vibrant strawberry topping, they deliver maximum flavor in every single bite.
Key Takeaways
- Discover an easy recipe for restaurant-quality dessert
- Learn how to create perfectly balanced strawberry cheesecake bars
- Master a versatile dessert suitable for any occasion
- Understand the art of combining creamy and fruity flavors
- Explore a make-ahead dessert that impresses guests
Why Strawberry Cheesecake Bars Are the Perfect Dessert Choice
Finding the perfect dessert is a challenge. Strawberry cheesecake bars stand out. They offer great taste and health benefits.
Health Benefits of Strawberries in Desserts
Strawberries are more than tasty. They’re full of nutrients. Here’s what they bring to your dessert:
- Rich in vitamin C for immune support
- Contains powerful antioxidants that fight free radicals
- Low-calorie fruit option for health-conscious dessert lovers
- Supports heart health with natural compounds
Convenience of Bar-Style Desserts
Strawberry cheesecake bars are super convenient. Their small size is great for:
- Parties and potlucks
- Portion-controlled treats
- Easy transportation
- Quick grab-and-go snacking
Make-Ahead and Storage Benefits
Busy lives need desserts that fit your schedule. Strawberry cheesecake bars are perfect for making ahead. Store them in an airtight container in the fridge. They stay fresh for up to 5 days.
Essential Ingredients for Perfect Strawberry Cheesecake Bars
Making delicious strawberry cheesecake bars starts with picking the right ingredients. Success comes from using high-quality parts that mix well. This creates a dessert that tastes amazing.
For the graham cracker crust, you need a few basic items. These items make the crust crisp and flavorful. They also match the creamy filling perfectly.
- Graham cracker crust ingredients:
- Graham cracker crumbs
- Unsalted butter
- Granulated sugar
The cheesecake filling needs top-notch ingredients for its smooth, rich texture. Full-fat cream cheese is key for a creamy layer.
| Cheesecake Filling Ingredients | Quantity | Purpose |
|---|---|---|
| Cream cheese | 16 oz | Base of creamy filling |
| Granulated sugar | 1/2 cup | Sweetness |
| Large eggs | 2 | Binding and structure |
| Vanilla extract | 1 tsp | Flavor enhancement |
Fresh strawberries are the highlight of your topping. Choose ripe, vibrant berries that are deep red and smell great. Using peak-season strawberries makes your cheesecake bars truly special.
- Fresh strawberry topping essentials:
- Ripe strawberries
- Powdered sugar
- Lemon juice
With these premium ingredients, your strawberry cheesecake bars will be a hit. They will impress everyone you share them with.
Kitchen Tools and Equipment You’ll Need
To make delicious strawberry cheesecake bars, you need the right tools and equipment. Having the right gear makes baking smooth and helps you make perfect dessert bars every time.
Choosing the right kitchen equipment is key to great baking. Here are the essential tools for amazing strawberry cheesecake bars.
Baking Pan Specifications
Your cheesecake baking pan is very important. Keep these specs in mind:
- 9×13 inch rectangular pan for bar-style desserts
- Recommended materials: Non-stick metal or glass bakeware
- Depth of 2-3 inches for optimal layering
- Removable bottom or springform design for easy cutting
Mixing Equipment Requirements
Good mixing is essential for smooth, creamy cheesecake bars. You’ll need:
- Stand mixer or high-powered hand mixer
- Large mixing bowls with varying sizes
- Rubber spatulas for scraping sides
- Whisk for blending ingredients
Temperature Monitoring Tools
Being precise with temperature is important in baking. Get these tools:
- Oven thermometer to verify accurate temperatures
- Instant-read digital thermometer
- Cooling rack for proper heat distribution
With these tools and equipment, you’re ready to make tasty strawberry cheesecake bars. They’ll impress your family and friends.
Creating the Perfect Graham Cracker Crust Base
Making the perfect homemade crust is key for delicious strawberry cheesecake bars. Your graham cracker crust is the base that can make or break your dessert. Let’s explore how to turn simple ingredients into a tasty cheesecake base.
To make an amazing graham cracker crust, you need a few important ingredients and some precise steps. Start by picking high-quality graham crackers – their taste will greatly affect your dessert. Mix crushed graham crackers with melted butter for the perfect texture for your cheesecake bars.
- Choose fresh, crisp graham crackers
- Use unsalted butter for consistent results
- Aim for a fine, even crumb texture
- Press the crust firmly into your baking pan
Texture is key when making your homemade crust. You want a mix that holds together when pressed but isn’t too thick. Pro tip: Use a flat-bottomed measuring cup or glass to press the graham cracker mix evenly. This ensures a uniform base for your cheesecake bars.
Here are some ways to make your graham cracker crust even better:
- Add ground cinnamon for extra warmth
- Mix in finely chopped nuts for crunch
- Experiment with chocolate graham crackers
- Pre-bake the crust for 10 minutes to enhance stability
Your cheesecake base is the start of the whole dessert. By mastering the graham cracker crust, you’re making a delicious base. This base will perfectly complement the creamy cheesecake and fresh strawberry topping.
Mastering the Creamy Cheesecake Layer
Making the perfect creamy cheesecake layer needs precision and skill. Your strawberry cheesecake bars depend on mastering the art of mixing and controlling temperature. This ensures a smooth texture that feels like it melts in your mouth.
Temperature Control for Perfect Ingredients
The secret to a smooth cheesecake is in the ingredient temperature. Let cream cheese and eggs sit at room temperature for 30-45 minutes before mixing. Cold ingredients lead to lumpy batter, while the right temperature makes them blend perfectly.
- Remove cream cheese 30-45 minutes before mixing
- Ensure eggs are at room temperature
- Use a rubber spatula for gentle mixing
Expert Mixing Techniques
For a luxurious smooth texture, follow these mixing tips. Beat the cream cheese until it’s soft, then add sugar slowly. When adding eggs, mix each one in separately, just until they’re fully incorporated.
| Mixing Stage | Technique | Duration |
|---|---|---|
| Cream Cheese | Beat until smooth | 2-3 minutes |
| Sugar Incorporation | Add gradually | 1 minute |
| Egg Addition | One at a time | 30 seconds per egg |
Avoiding Common Mixing Mistakes
To avoid cheesecake disasters, steer clear of common mistakes. Overmixing introduces air bubbles that can cause cracking. Undermixing leads to a lumpy texture. Aim for a batter that’s smooth and consistent, like thick cream.
- Stop mixing when ingredients are just combined
- Use low speed on mixer
- Scrape bowl sides frequently
Fresh Strawberry Topping Preparation
Making the perfect strawberry topping can take your cheesecake bars to the next level. Choosing the right strawberries is key for a delicious fresh fruit dessert. It will impress your guests and make their taste buds happy.
Here’s how to prepare your strawberry topping:
- Choose ripe, vibrant red strawberries with a sweet aroma
- Wash berries gently under cool water
- Pat dry with paper towels to remove excess moisture
- Hull and slice strawberries into uniform pieces
You can prepare your cheesecake topping in different ways:
- Fresh sliced method: Thinly slice strawberries for a clean, bright presentation
- Macerated approach: Combine sliced strawberries with a touch of sugar to release natural juices
- Sauce technique: Blend some strawberries to create a smooth, drizzleable topping
Pro tip: Add a small amount of lemon juice to your strawberry topping. It will make the fruit’s flavor pop and keep the topping from being too sweet. Your homemade strawberry cheesecake bars will look and taste amazing.
Step-by-Step Baking Instructions for Strawberry Cheesecake Bars
Baking cheesecake bars needs care and focus. Success comes from knowing the right steps. Let’s go through the key steps to make perfect strawberry cheesecake bars.
Optimal Baking Temperature Guide
Getting the right temperature is key. Preheat your oven to 325°F (165°C). This gentle heat prevents cracks and makes the cheesecake smooth.
| Oven Type | Recommended Temperature | Baking Time |
|---|---|---|
| Conventional Oven | 325°F | 35-40 minutes |
| Convection Oven | 300°F | 30-35 minutes |
Visual Doneness Indicators
Knowing when cheesecake is done is important. Look for these signs:
- Edges should be slightly golden and set
- Center has a slight jiggle when gently shaken
- Surface appears matte, not wet or glossy
Cooling Process Tips
Cooling cheesecake right is key. Remove from oven and let cool at room temperature for 1 hour. Then, refrigerate for at least 4 hours before serving.
- Turn off oven after baking
- Leave cheesecake bars in the oven with door slightly open
- Cool gradually to prevent sudden temperature changes
- Refrigerate for optimal texture
By using these exact baking and cooling steps, you’ll make strawberry cheesecake bars that are creamy, smooth, and irresistible.
Decorating and Presentation Ideas

Improve your cheesecake decoration skills with these stunning presentation techniques. They will turn your strawberry cheesecake bars into a visual masterpiece. The art of dessert presentation is not just about taste. It’s about creating an experience that delights all the senses.
Begin with a pristine white plate as your canvas. Cut your cheesecake bars into clean, precise rectangles using a hot knife dipped in warm water. This method ensures smooth edges that showcase your baking precision.
- Create an elegant strawberry garnish by:
- Slicing fresh strawberries into thin, fan-shaped arrangements
- Placing whole strawberries at strategic points on the plate
- Dusting with powdered sugar for a delicate finish
For an extra touch of sophistication, consider these cheesecake decoration ideas:
- Drizzle dark chocolate in delicate zigzag patterns
- Add a small mint leaf for a pop of green contrast
- Pipe whipped cream rosettes around the bars
When serving at parties, arrange the bars on a wooden board or elegant platter. Stack them slightly offset to create visual interest. This invites guests to indulge in your carefully crafted dessert.
Pro tip: Chill your bars before serving to maintain their pristine shape. This enhances the creamy texture that makes strawberry cheesecake bars so irresistible.
Storage and Shelf Life Guidelines
Keeping your strawberry cheesecake bars fresh is key. After baking, refrigerate them within two hours. Use an airtight container or wrap them tightly with plastic wrap to keep moisture in and odors out.
These bars can last 3 to 5 days in the fridge. Store them in the coldest part of your fridge, like the back shelf. Make sure the container is flat to keep the bars looking good.
Freezing is a great way to make them last longer. Wrap each bar in plastic wrap, then put them in a freezer-safe container. Frozen bars can stay good for up to 2 months. Thaw them in the fridge overnight to keep them smooth and prevent moisture buildup.
Watch for signs of spoilage like bad smell, color change, or mold. Always rely on your senses to check if the bars are safe to eat. By following these tips, your strawberry cheesecake bars will stay fresh and delicious.